How to free up space safely in CentOS

When we run out of space in a Linux server, usually bad things happen (like full logs, inability to launch new processes, problems creating and opening files, and many more similar beauties), therefore it’s a good idea to have a quick reference to free up space quick in case of need.

This procedure is divided into 2 areas: the Quick Reference useful when you have an incident and need to free up space quick, and the Comprehensive Guide on how to free up space, so we can proceed to free up some more space once the server is not into a critical state.

Quick Reference 

1.- First of all and before you do any emergency cleanup, take a SNAPSHOT, so we can revert to a previously working state in case we delete something valuable, or that we can retrieve later some of the content deleted to be able to do a postmortem analysis.

2.- Cleanup yum and man caches for a quick win (they can always be re-created later)

sudo yum clean all
sudo rm -rf /var/cache/yum
sudo rm -rf /var/tmp/yum-*
sudo rm -rf /var/cache/man/

3.- Remove old kernels

package-cleanup --oldkernels --count=1

e.g.,

[root@localhost /]# package-cleanup --oldkernels --count=1
Loaded plugins: fastestmirror
--> Running transaction check
---> Package kernel.x86_64 0:3.10.0-1127.el7 will be erased
---> Package kernel-devel.x86_64 0:3.10.0-1127.el7 will be erased
--> Finished Dependency Resolution
 
Dependencies Resolved
 
============================================================================================================================================================
 Package                                   Arch                            Version                              Repository                             Size
============================================================================================================================================================
Removing:
 kernel                                    x86_64                          3.10.0-1127.el7                      @anaconda                              64 M
 kernel-devel                              x86_64                          3.10.0-1127.el7                      @C7.8.2003-base                        38 M
 
Transaction Summary
============================================================================================================================================================
Remove  2 Packages
 
Installed size: 102 M
Is this ok [y/N]: y
Downloading packages:
Running transaction check
Running transaction test
Transaction test succeeded
Running transaction
  Erasing    : kernel-3.10.0-1127.el7.x86_64                                                                                                            1/2
  Erasing    : kernel-devel-3.10.0-1127.el7.x86_64                                                                                                      2/2
  Verifying  : kernel-devel-3.10.0-1127.el7.x86_64                                                                                                      1/2
  Verifying  : kernel-3.10.0-1127.el7.x86_64                                                                                                            2/2
 
Removed:
  kernel.x86_64 0:3.10.0-1127.el7                            kernel-devel.x86_64 0:3.10.0-1127.el7
 
Complete!

Note: in order to remove kernels and other packages, yum-utils need to be installed, if it’s not installed, you can install it as it is a really small package and well worth it:

yum install yum-utils

4.-  Remove orphan packages

First review orphan packages in our system:

package-cleanup --quiet --leaves --exclude-bin

e.g.,

[root@localhost /]# package-cleanup --quiet --leaves --exclude-bin
libdnet-1.12-13.1.el7.x86_64
libicu-50.2-4.el7_7.x86_64
libsysfs-2.1.0-16.el7.x86_64
samba-libs-4.10.16-18.el7_9.x86_64

And then you can safely delete them:

package-cleanup --quiet --leaves --exclude-bin | xargs yum remove -y

The above commands can be launched more than one time, as the packages deleted with the first batch could create additional orphan packages again, so you can repeat these steps until no orphan packages appear anymore after the first package-cleanup command.

e.g.,

[root@localhost /]# package-cleanup --quiet --leaves --exclude-bin | xargs yum remove -y
Loaded plugins: fastestmirror
Resolving Dependencies
--> Running transaction check
---> Package libdnet.x86_64 0:1.12-13.1.el7 will be erased
---> Package libicu.x86_64 0:50.2-4.el7_7 will be erased
---> Package libsysfs.x86_64 0:2.1.0-16.el7 will be erased
---> Package samba-libs.x86_64 0:4.10.16-18.el7_9 will be erased
--> Finished Dependency Resolution
 
Dependencies Resolved
 
=============================================================================================================================================================
 Package                                 Arch                                Version                                    Repository                      Size
=============================================================================================================================================================
Removing:
 libdnet                                 x86_64                              1.12-13.1.el7                              @anaconda                       69 k
 libicu                                  x86_64                              50.2-4.el7_7                               @koji-override-1                24 M
 libsysfs                                x86_64                              2.1.0-16.el7                               @anaconda                       146 k
 samba-libs                              x86_64                              4.10.16-18.el7_9                           @updates                        679 k
 
Transaction Summary
=============================================================================================================================================================
Remove  4 Packages
 
Installed size: 25 M
Downloading packages:
Running transaction check
Running transaction test
Transaction test succeeded
Running transaction
  Erasing    : libicu-50.2-4.el7_7.x86_64                                                                                                                1/4
  Erasing    : libsysfs-2.1.0-16.el7.x86_64                                                                                                              2/4
  Erasing    : samba-libs-4.10.16-18.el7_9.x86_64                                                                                                        3/4
  Erasing    : libdnet-1.12-13.1.el7.x86_64                                                                                                              4/4
  Verifying  : libdnet-1.12-13.1.el7.x86_64                                                                                                              1/4
  Verifying  : samba-libs-4.10.16-18.el7_9.x86_64                                                                                                        2/4
  Verifying  : libsysfs-2.1.0-16.el7.x86_64                                                                                                              3/4
  Verifying  : libicu-50.2-4.el7_7.x86_64                                                                                                                4/4
 
Removed:
  libdnet.x86_64 0:1.12-13.1.el7            libicu.x86_64 0:50.2-4.el7_7        libsysfs.x86_64 0:2.1.0-16.el7         samba-libs.x86_64 0:4.10.16-18.el7_9
 
Complete!

5.- Delete the updatedb (as we can run “updatedb” to recreate it later -it doesn’t come installed by default- ):

First locate the path of the db, and then delete:

locate --statistics
Database /var/lib/mlocate/mlocate.db:
    12,841 directories
    88,414 files
    5,456,472 bytes in file names
    2,197,019 bytes used to store database
 
sudo rm /var/lib/mlocate/mlocate.db -f

6.- We can compress old logs that we need to keep, using bzip2 on max setting (note that some minimum space is needed in order to be able to compress a file, we cannot compress a file if it is kept in a FS that is 100% full):

bzip2 -9 file
 
bzip2 -9 file*.log

Note: if we haven’t got space to compress a file on the FS where we are, then we can move them (to /tmp for example), compress them, and move back to their original place.

bzip2 is the compressor that compresses the most, but any others can be used, like compress.

To locate big log files quickly:

find . -xdev -name "*.log" -ls | sort -nk7      # <-- check all log files in the current FS, sort by size  
 
find . -xdev -name "*.log" -ls | sort -nrk7     # <-- same cmd as before, but sorted in reverse-order (bigger files first, some people prefer this output)
  
find / -xdev -name nohup.out -ls | sort -nk7    # <-- check all nohup logs in root FS

e.g.,

[root@localhost log]# find . -xdev -name "*.log" -ls | sort -nk7
67149905    0 -rw-------   1 root     root            0 Apr 11 07:22 ./anaconda/anaconda.log
67149907    0 -rw-------   1 root     root            0 Apr 11 07:22 ./anaconda/program.log
67149908    0 -rw-------   1 root     root            0 Apr 11 07:22 ./anaconda/packaging.log
67149909    0 -rw-------   1 root     root            0 Apr 11 07:22 ./anaconda/storage.log
67509355    0 -rw-------   1 root     root            0 Apr 11 07:22 ./anaconda/ifcfg.log
67509356    0 -rw-------   1 root     root            0 Apr 11 07:22 ./anaconda/ks-script-AO4ae1.log
67509357    0 -rw-------   1 root     root            0 Apr 11 07:22 ./anaconda/ks-script-Iozn9c.log
67509358    0 -rw-------   1 root     root            0 Apr 11 07:22 ./anaconda/ks-script-YLP_La.log
67509359    0 -rw-------   1 root     root            0 Apr 11 07:22 ./anaconda/journal.log
33799324    4 -rw-r--r--   1 root     root           61 Apr  1 16:30 ./vboxadd-setup.log
34335571    4 -rw-r--r--   1 root     root          470 Mar 15 17:25 ./vboxadd-install.log
67151044   12 -rw-r--r--   1 root     root        10099 Apr  1 16:30 ./tuned/tuned.log
33554521   16 -rw-------   1 root     root        12314 Apr 11 07:10 ./yum.log
465479   1180 -rw-------   1 root     root      1207418 Apr 11 07:20 ./audit/audit.log

7.- If we cannot free up enough space, we can expand the disk or add a new disk on the VM and expand the FS mounted over the disks. This option is fairly straightforward in a VM, but can be more cumbersome in a physical server.

This option is also the best option to gain free space without any other side-effects.

To do this procedure, refer to the appropriate official documentation for each case, for example here is the documentation from AWS and VMware:

VM in AWS: Extend a Linux file system after resizing a volume

VM in VMware: Extending a logical volume in a virtual machine running Red Hat or Cent OS

Comprehensive Guide

1.- Look at the FS space from root:

cd /; df -h

And then find out the biggest directories, so we can find out where most space is being consumed:

du -hs * --exclude=proc | sort -hr

e.g.,

[root@localhost /]# cd /; df -h
Filesystem      Size  Used Avail Use% Mounted on
devtmpfs        237M     0  237M   0% /dev
tmpfs           244M     0  244M   0% /dev/shm
tmpfs           244M  4.5M  240M   2% /run
tmpfs           244M     0  244M   0% /sys/fs/cgroup
/dev/sda1        40G  4.4G   36G  12% /
tmpfs            49M     0   49M   0% /run/user/1000  
 
[root@localhost log]# du -hs * --exclude=proc | sort -hr | head
1.2M    audit
268K    messages-20220329
216K    anaconda
84K     messages-20220405
60K     messages-20220410
28K     secure-20220329
28K     dmesg.old
28K     dmesg
20K     messages
20K     cron-20220410

2.- Once we have identified the biggest space hogs, now we can drill-down and investigate this directories to see if we can clear unneeded stuff.

To take into consideration:

some file extensions that can be deleted “somewhat” safely:

*.rpm     ← linux software packages (they can be deleted and downloaded later via yum, or moved to /tmp)

*.dmp    ← program or linux core dumps

*.trc       ← traces & debug info from programs

*.iso      ← program ISOs (usually they can be downloaded again, but check just in case)

To check unknown files we can use the command:

file file-to-check

If the “file” command does not satisfy us (like when it reports a binary or executable file), we might be able to find out some more info about our file using strings:

strings file-to-check

This command will show all ASCII strings kept on the file, where we can check for copyright msgs, product & version strings or other constants that we might use to find out more information about our file.

e.g.,

[root@localhost /]# file swapfile
swapfile: Linux/i386 swap file (new style), version 1 (4K pages), size 524287 pages, no label, UUID=d72cb0f6-7d72-4f03-b0c2-c652bf245c9a

[root@localhost /]# file bin
bin: symbolic link to `usr/bin'

[root@localhost /]# file /var/log/lastlog
/var/log/lastlog: data

[root@localhost /]# file /var/log/vboxadd-install.log
/var/log/vboxadd-install.log: ASCII text

[root@localhost bin]# file yes
yes: ELF 64-bit LSB executable, x86-64, version 1 (SYSV), dynamically linked (uses shared libs), for GNU/Linux 2.6.32, BuildID[sha1]=62e4da10c23933e52f6c398b1546fa8e6f286206, stripped
 
[root@localhost bin]# strings yes | less
...
Try '%s --help' for more information.
Usage: %s [STRING]...
  or:  %s OPTION
Repeatedly output a line with all specified STRING(s), or 'y'.
      --help     display this help and exit
      --version  output version information and exit
http://www.gnu.org/software/coreutils/
Report %s translation bugs to <http://translationproject.org/team/>
For complete documentation, run: info coreutils '%s invocation'
%s online help: <%s>
GNU coreutils
/usr/share/locale
David MacKenzie
standard output
8.22
...

3.- Check quickly for any big files in root specifically:

find / -xdev -size +10M -ls             # <-- files bigger than 10 MB (-xdev=do not traverse FS, -this ignores NFS mounts for example-)
 
find / -xdev -size +25M -mtime -2 -ls   # <-- files bigger than 25 MB changed in the last 2 days
 
find / -xdev -size +50M -mmin -30 -ls   # <-- files bigger than 50 MB changed in the last 30 minutes

4.- Check wrong devices in /dev (check for “rmto”,”rmt0.1″,”null 2>&1″, etc, specially look for BIG files, as they shouldn’t be any in /dev )

find /dev -xdev -size +1M -ls

This files can get created by wrongly formed redirection operators to /dev/null, tape devices, etc. In our days is not very common to see this condition, but worth checking when we need to recover space.

5.- Check for core dumps, actually they are disabled by default in Linux, since they can be quite big depending on the amount of RAM present on the system and we might find a few, depending on the frequency of the issue that causes the dump on the first place:

coredumpctl

If there are any, this command will show a list of them, so we can decide to take them off this server for support or delete them directly.

e.g.,

[root@localhost]# coredumpctl
No coredumps found.

6.- Truncate logs in /var/log bigger than 150 Mb & older than a week or older than one month (this step destroys data and it’s just an example, adapt it to your needs):

find /var/log -name "*.log" \( \( -size +150M -mtime +7 \) -o -mtime +30 \) -exec ls {}\;  #<-- first list the files that will be truncated
 
find /var/log -name "*.log" \( \( -size +150M -mtime +7 \) -o -mtime +30 \) -exec truncate {} --size 5M \; #<-- then truncate them to a specific size, in this case 5Mb

7.- Check for zero files, they do not really use space, but they do consume inodes & can also cause issues (and frankly, they do visually molest when there are many of them).

ls -l | awk '{ if ($5 == 0) print $0 }'                  # <-- first review the empty files, just in case...
 
ls -l | awk '{ if ($5 == 0) print $9 }' | xargs rm       # <-- ...then zap'em!

Setup a KeePass DB for different users and roles.

How to setup a KeePass master DB and export to secondary DBs for user control.

KeePass is an excellent open-source passwords DB, with lots of plugins, forks and functionalities. However, one thing that it lacks is the user/password support, therefore we cannot have a master DB with all the user/passwords and give permissions to read/write to different users o departments, or can we?

Well, there are two ways about this, one is to purchase an enterprise flavour of KeePass-compatible software like LastPass, Keeper, Pleasant, enpass, 1password, etc. just do a little of research, maybe signup a trial of each, and then decide which one might fit better to your organization or use case; and the second way is to do the poor-man’s hack: use the KeePassSubsetExport plugin, which is enough for home and small and medium-sized enterprises (SMEs) setups.

This setup works surprisingly well, basically what we have is a master keepass DB with all the entries, then, depending of the tags on each entry, KeePassSubsetExport handles the creation of a different keepass db using this tags and a couple of settings of its own. This keepass exports are great, because they can get created in different locations, with different names and different db passwords, so we can have different keepass dbs for development, systems, networking, devops, management, you’ll name it.

I am going to explain how to do this setup step-by-step with a new keepass db that I am going to create for this task.

Step 1.- Lets install KeePass for windows (sorry about this, but the original keepass is the only one that I know of that has keepass plugin support).

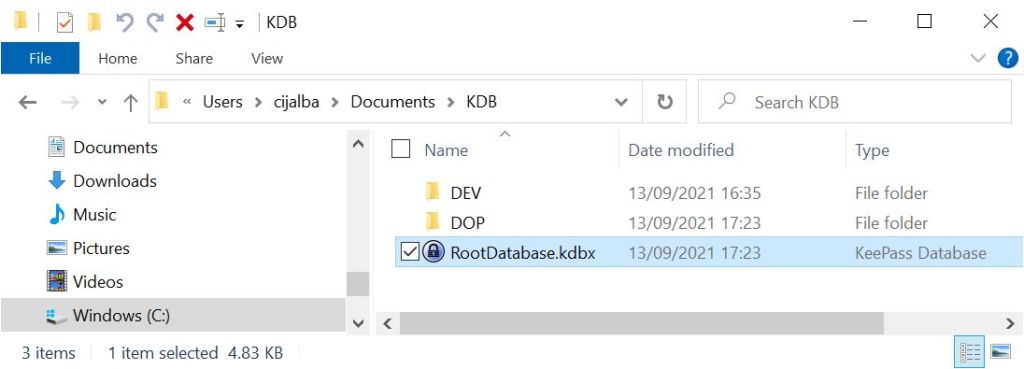
Once installed, we will create a new database called RootDatabase an we will save it under a new folder in My Documents called KDB.

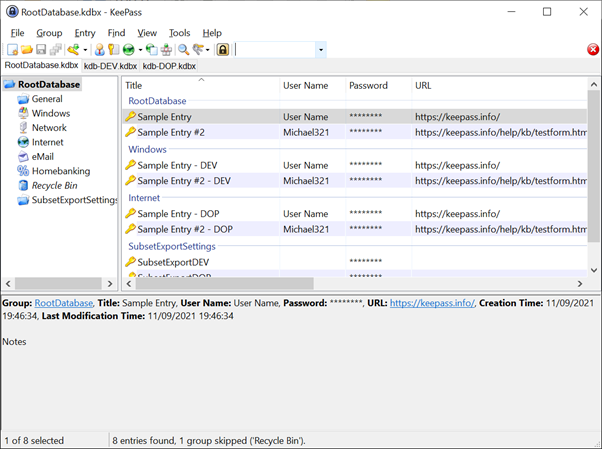
KeePass default entries created for you.

As we can see on the screenshot, KeePass creates a default sample folder structure, with a couple of sample entries, to help us out using KeePass for the first time.

From the windows explorer, we will also create a couple of folders called DEV & DOP under Documents/KDB.

Create a KDB folder to store KeePass DBs (for example)

Step 2.- Lets install KeePassSubsetExport plugin in our keepass.

Go to the KeePassSubsetExport project page: https://github.com/lukeIam/KeePassSubsetExport/releases

and download the KeePassSubsetExport.plgx file from the latest release listed. 

Once downloaded, move it to your KeePass/plugins folder (typically C:\Program Files (x86)\KeePass Password Safe 2\Plugins)

Step 3.- KeePass loads its plugins at startup, therefore we need to close and reopen KeePass in order to use the new plugin.

Step 4.-Lets fill in a few entries in KeePass, and add some TAGs to them.

We can copy the 2 samples on the root folder easily by doing Ctrl-k with both of them selected and it will duplicate them adding “– copy” at the end of each entry, move this entries to the windows folder, and rename the ”– copy” for “– DEV” (double click on each entry lets you edit it).

Add Tags to your entries

Now we will add a tag to this 2 entries on the windows folder, select them both, right click them, Edit Entry (Quick) > Add Tag > New Tag > DEV.

Now we can repeat the previous step again, but this second round we will change the “– copy” to “– DOP”, and move the 2 new entries to the internet folder. Then we will add the tag DOP, which will have to be created as before (Edit Entry (Quick) > Add Tag > New Tag > DOP).

Step 5.- We’ll configure the plugin, so every time that we save the keepass DB, 2 additional DBs will be created, one for development (tag: DEV) and another one for DevOps (tag: DOP). So far we have 6 entries, 2 without tags, 2 with DEV tag and 2 with DOP tag, so when we save, the original keepass will have all 6 entries, then the DEV keepass will have 2 and the DOP keepass will have another 2 entries. 

To enable this behaviour, all that we need to do is to create a folder called: SubsetExportSettings, and inside that folder, we will create 2 entries: SubsetExportDEV & SubsetExportDOP. Let’s go step by step:

To create a folder in KeePass, select the root folder, right click and select Add New Group > SubsetExportSettings:

Plugin Settings

Once we have the group, we select it and on the right panel, add a new entry (Ctrl+i) and we will enter: SubsetExportDEV, and under the password field, we will entry the password that we want this keepass db export to be opened with (KeePass master password), in the example it will be Developer5.

Now don’t press OK just yet, change over to the TAB Advanced, and add a String Field called SubsetExport_Tag and with a value of DEV:
Setting to control the TAG that will be exported on this KDB.

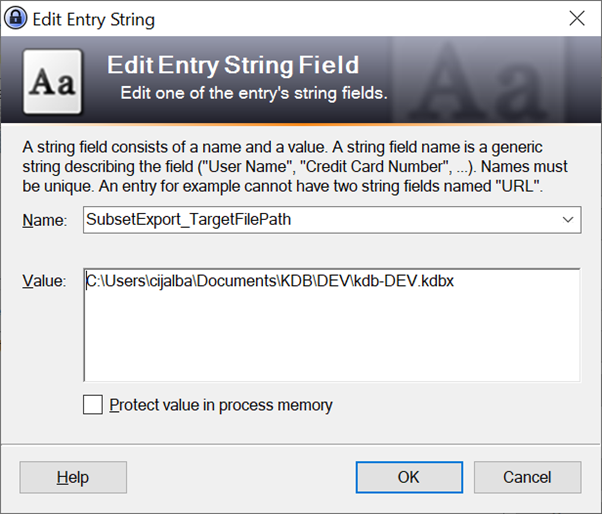
Now you can press OK, and Add a new string field: SubsetExport_TargetFilePath, and on the value field, we will enter the path of the DEV kdb that we want to save to, in my example, it will be C:\Users\cijalba\Documents\KDB\DEV\kdb-DEV.kdbx

Setting to control where the exported KDB will be saved to

Press OK, and you now will have the 2 string field entries that control the KeePassSubsetExport plugin.

SubSetExport Entries

OK, so we have the SubsetExportDEV entry created, now we select it, right click Duplicate Entry (Ctrl+k), and rename it to SubsetExportDOP, and we will change all the settings accordingly: SubsetExport_Tag DEV value changed to DOP, and SubsetExport_TargetFilePath to C:\Users\cijalba\Documents\KDB\DOP\kdb-DOP.kdbx.

That’s it, we have it all setup now!

Step 6.- Save the keepass DB and check that the other DBs have been correctly created in the specified locations, with their appropriate passwords, and that we can only see the entries tagged as we wanted (note that empty groups do not get exported, therefore DEV will only have the Windows group and DOP will only have the Internet group).

As we can have more than one keepass DB open at the same time, I suggest that we open our 3 kdbs and compare them.

One tip that I use to check different kdbs, is to go to the keepass search field and press enter, and that will show all the entries of the DB on the right pane, but most importantly it will show the total number of entries of the opened db on the status bar at the bottom, as we can see on this screenshot:

All keepass DB entries

Now change tabs to the other keepass db’s, Search box > enter and compare the result over the 3 different keepass dbs.

Final Notes.- To use this setup in a networked environment, we can setup the file paths of the exports using URNs, therefore we can export directly to a path like \\nas-box01\dev\dev.kdbx, so we can use additional protection to each db by using folder & file user permissions, apart from the KeePass master password, that way a user will need to have access to the folder first, to the keepass db file second, and to the keepass db password on third instance, which is quite secure (if additional security is needed, then a keepass key file can be added to the equation -look at the keepass documentation-).

Some windows 21H1 update mutes microphones…

Indeed. After updating a few different branded laptops, the microphone seems to be muted at the OS level in a couple of them, and fiddling with the Microphone & Sound Settings doesn´t seem to fix it.

Your branded diagnostics software won’t find anything wrong with it, since the hardware does work OK, but any other app in windows will just not budge…

Hopefully looks like the integrated “Troubleshoot” diagnostics embedded in Settings > System > Sound > Input seems to detect this condition and fix it.

Another known way to fix it, is just to reinstall microphone drivers, but since it’s just a matter to unmute this leftover present from the update, we might as well just leave the troubleshooter fix it for us. We can update to the latest drivers on another time…

The quick-fix is: head over the search box, type “sound” and press enter

click on “Troubleshoot” button underneath the “Test your microphone“. That should diagnose the issue, detect the muted microphone and un-mute it, fixing the issue.

If this step has fixed it, but the microphone is always on and whatever you speak can be heard over the speakers, even after you close the Sound Settings app, then a different issue might also be present. To fix this second issue, head over to the search box, type “sound” again, select “Sound Control Panel” up on the right,

then select the Recording tab, the Microphone device shown with a green check, then “Properties” button.

change to the Listen tab, and tick off the box marked as “Listen to this device“, and finally on the OK button.

And that should be all there is to it…

Usually I find quite useful this resources to check the microphone and speakers in a computer, since they are browser based and work as good under windows, mac or linux, which is a bonus.

https://www.onlinemictest.com/

https://www.onlinemictest.com/sound-test/

Some official microsoft resources that might come handy with other problems:

Microsoft: Fix Microphone Problems

MyOwnView in: IBM AIX Operating System

IBM Professional-grade UNIX offer: AIX from (Advanced Interactive eXecutive), is to myself, one of the more robust and easy-to-use UNIX available (or at least that I have used as a professional system’s administrator).

AIX v1 was released in 1986 for a RISC processor, it was based in UNIX System V and had some features from BSD UNIX.

I started using AIX on its version 4.3.1 around 1998 while I worked for Independent Insurance C.L., in Cheadle Royal, Manchester, and until it’s 7.2 version in 2018, which is the last version I have used, it has been around 12 years administering production and development servers (between those dates I have been administering on and off AIX and IBM i servers).

I managed to get 2 official IBM AIX certifications, in System Administration and System Support for AIX v4.3 in 2001 whilst working as an IBM Open Systems Consultant, and IBM gave me a nice couple of pins, that I use to wear quite proudly on my leather paper folder. 🙂

AIX is my favorite flavor of UNIX: it’s robust, stable, and easier than other UNIXes.

However it has the same problem as another IBM OS (IBM i): it can only be ran on IBM Power processors, and there are no emulators available, therefore, you can only learn AIX by having a power server.
A project to write a powerpc emulator appeared, called PearPC that was in development for 10 years, however it was discontinued before it released a working version capable to run AIX, it did however manage to run Darwin and Mac OS X.

Power9 Server

IBM started in 2019 offering POWER servers in its cloud, and that means capability to run AIX and IBM i workloads or development environments. For the time being there is no power servers on the free-tier, mind.

There are many advantages that AIX had even 20 years ago compared with its competency, like it’s robust LVM, it’s device configurator ( cfgmgr ), and it’s system diagnostic utilities ( diag ).

The Logical Volume Manager (LVM) is even today the most flexible and easy to use LVM that I have administered. Compared with Linux and Solaris, it’s years ahead (at least that’s what it seems to me, I’m sure that many people might say otherwise):
It supports Volume Groups (VG) that can be exported from one system to another, Logical Volumes (LV) that can be resized on the fly, and it’s own File Systems (JFS2) that support encryption and snapshots.

Live Partition Mobility was introduced in 2007 with AIX 6.1, where a system running under a Logical Partition or LPAR could be moved over to another server on the fly and with it’s users still logged in and the applications running, this was an amazing feat of the day (in the VMware world this is called vMotion, and it was introduced 4 years earlier: in 2003).

Workload partitions (WPARs) where also introduced in 2007 with AIX 6.1, this being virtualized operating system environments within a single instance of the AIX operating system, bringing similar features to docker or Linux containers, but predating docker by nearly 6 years and LXC by one year, and bringing a different set of features (more biased towards enterprise-grade).

Initially, the OS was highly tied to the hardware where it ran, the first one was the Workstation IBM RT PC, then it came the servers line named RS/6000‘s and after pSeries.
Today the IBM Power Systems are not tied to a specific OS anymore, they have their own hypervisor called PowerVM, that can run AIX, IBM i and PowerLinux.

AIX has Linux compatibility since it’s version 5L (L for Linux compatible), and a great number of linux tools can be installed easily in AIX, and some others have been ported by IBM itself in it’s IBM AIX Linux Toolbox.

Curiously, AIX has a system config DB called Object Data Manager (ODM), similar to Windows Registry, but again released a lot before Microsoft’s Windows.

And another excellent feature is it’s alternate boot disk installation, where we can have 2 OS boots to try new parches & versions and easily perform rollbacks.

AIX also has some excellent toolkits:

  • SMIT: the System Maintenance Interface Tool, used by all AIX newbies to perform admin tasks, but also used by veterans since it has an extremely handy feature: it can show the commands underneath a menu choice, therefore it is quite often used for scripting or to learn new commands that we haven´t used before.
  • aixpert: a hardening utility to help secure the system to a predefined baseline and perform regular security checks with the help of predefined scripts via CLI or GUI. It this sounds boring or bland, damn boy!, it can find out easily if you have been hacked! it’s like having a security expert sat next to you.
  • diagnostic subsystem: an impressive array of tools for system hardware and OS maintenance with special settings for field service engineers (FSE’s), it has all kinds of tests and diagnostics that can be executed from here, system errors and logs can get reviewed, and general system health-checks can be ran on the problems registered by the system. Really an FSE’s dream.
  • nmon: a very complete and powerful performance monitor (it’s original name comes from Nigel’s performance monitor).
  • NIM: Network Installation Manager that brings enterprise-class OS installation and update platform to the AIX infrastructure. It can also be used as a image backup repo.
  • mksysb: Make System Backup, another utility that has been there since the beginning of times to make Bootable system backups and greatly simplifying DR scenarios.
  • PowerHA: previously known as HAC/MP is a high availability clustering software.
  • Live Kernel Update: LKU, permits updating the OS without a reboot (by using it’s own WPAR technology).

Just before I finish an underrated but great feature that should also be named is it’s binary compatibility: applications from AIX 3.0 (~20 years ago) run happily on AIX 7.2 today.

There has been a couple of years since the last time that I used an AIX box, and I do miss the OS (but then again, I also greatly miss IBM i, another fabulous Operating System).
But as has happened to me in the past, I hope that I will use again someday in the future, and I hope that the OS does not disappear or gets discontinued. Ever!.

After having worked with IBM hardware & VMs where you could install IBM i or AIX, i found out that AIX gives the best raw performance of the power hardware, as it definitely gives a lot more control over
any piece of hardware, however IBM i does a lot better job of having lots of concurrent users, gives power to the sysadmins and operators over the system resources and looks like it’s been designed to be run properly by teams of operators and sysadmins (ITIL environments), and then, the IBM i OS is self-tuning and if you don’t have technicians dedicated to it, it also does a fantastic job auto-administering itself quite decently.

So for performance and Linux compatibility: implement in AIX, and for multiuser & multitasking: go for i (I have written my opinion about IBM i in the previous post). They are both quite resilient OS’s (and modern, despite what many people might think, as they get updated frequently).

Until the next post, thanks for reading.

MyOwnView in: IBM i Operating System

In 1988 IBM launched a new computer system AS/400 with a Operating system called OS/400.

And as they say: and the rest, is history…

IBM i System Menu & Command Prompt

OS/400 was based on a previous couple of OS from IBM: System 36 & System 38, however they applied object oriented principles, and it’s one of the few
Object-oriented operating systems that are still in use today.

( Another Object Oriented OS that made it to mainstream were BeOS, OS/2 and NeXTStep –this one created by Steve Jobs when he was forced to leave Apple and that was used by Tim Berners-Lee to create something called World Wide Web ;o) in fact, the first web server was a NeXTStep ).

Other OS in use today (windows, unix, linux) are file-based, rather than object-oriented.

I first learned of the AS/400 in 1995 when I joined Southwestern-Bell Communications cable-TV company in Preston (UK), working as an operator trainee.
Used to MS-DOS and windows until that time, OS/400 was quite different (I also got into contact with Digital’s VAX, but that a story for another time), however the OS had it’s own training platform built-in, which helped me greatly to learn the OS basics very quickly (I think it was called AS/400
Information Assistant, it was menu based and quite well implemented, it did serve me well).

From V3R1 in 1995 to v7.1 which was the last version I used in 2014, it has been around 13 years administering the IBM i platform (between those
dates I have been administering on and off AIX and IBM i servers).

IBM i for me is as of today, my favorite operating system: it’s robust, stable, easy to use once you learn the basics, and very secure.

It’s main problem is that it’s a huge unknown operating system in the IT landscape, and since is is COMPLETELY different from other operating systems that we are more used to, it’s learning curve is somewhat steep. It’s not that it’s a difficult to learn OS, is just that like any enterprise OS is big and complex, and to get to grips with it at decent level takes a while.

An added problem is that IBM i can only be ran on IBM Power processors, and there are no emulators available, therefore, you can only learn IBM i having a power server and an IBM i licence.

Power9 Server

However you can use third party platforms to learn, like PUB400.COM which offers a free as well as a paid subscription service to try this awesome OS.

Also IBM began in 2019 offering POWER servers in its cloud, and that means capability to run IBM i and AIX workloads or development environments.
Unfortunally looks like there is no power servers on the free-tier, for the time being (hopefully IBM will add them one of this days making their OS more accessible to students and newbies).

AS/400 to IBM i used a 5250 terminal for remote access, however in our days, the recommended remote access protocol, as many other OS is SSH and the bash shell.

Note: For a basic and free 5250 terminal emulator to access an IBM i to use it’s usual screens, we can use TN5250J ( http://tn5250j.org/ ) which is java based.

tn5250j emulator – IBM i Login Screen

IBM has also changed IBM i’s name so many times to try to give it a modern look, that the “i” OS has sadly become also known for it’s name changes, rather than for its features:

  • 1988 AS/400 & OS/400 were introduced (AS for Application Server)
  • 2000 renamed eServer iSeries & i5/OS (i for Integration)
  • 2006 renamed as IBM System i & IBM i
  • 2008 replaced by IBM Power Systems, where the physical server is able to run PowerVM, IBM i, AIX and PowerLinux

For somebody outside the IBM i enviroment, all this names (AS/400, OS/400, iSeries, i5/OS, System i, IBM i, i for Business) are just not really known at all, which shows that the marketing policies chosen by IBM along the years for this platform have not been as succesful as others (like Apple & Microsoft).

Initially, the OS was highly tied to the hardware where it ran, the server named AS/400 ran OS/400, the iSeries ran iOS, and System i ran IBM i. Today the IBM Power Systems are not tied to a specific OS anymore, they have their own hypervisor called PowerVM, that can run IBM i, AIX and PowerLinux.

It is a extremely capable OS, all the work colleagues that I work or worked with that have, at one time worked with AS/400 or IBM i and they don’t anymore, confess that: like myself, we all miss working with IBM i.

The biggest selling point of IBM i, has always been it’s application integration, basically it comes with a load of software preloaded and that doesn’t need an extra licence (IBM i OS itself does need a valid licence), like IBMs DB2 database, data querying service, database management, security software, excellent communications support, a UNIX posix enviroment where to run UNIX applications, integrated backups, second-to-none batch-job support and schedulers, menu-based system administration with context-sensitive help, bullet-proof upgrades & patches management, and probably the biggest collection of shells that an OS comes with as standard (maybe it sounds daft, but it can run software from system 36 & system 38, from some 30-40 years ago, as well as the latest node.js or java, and that’s just a tremendous feat all by itself).

To top it all up, the OS auto-tunes itself for performance. Like any OS, it can benefit greatly from having a decent sysadmin and DB admins, but it doesn’t do that bad at all doing it all by itself!

The latest version of IBM i is v7.4 released in 2019, IBM keeps actively developing it, and I hope that will carry on for eons.

The latest Technology Refresh for 7.4 is TR 3, launched practically the other day: October 6, 2020. And in that TR, IBM has brought a load of well-known goodies to i: ansible, kafka, logrotate, man pages, openPGP, 7zip, apache camel, and updated a lot of OSS packages like curl, java, node.js, python libraries, etc. Also some interesting additions like pigz: a paralell processor compressor. My favourites are ansible, logrotate and the man pages.

Also migration is in the works to port postgreSQL, MongoDB and Cassandra, so there’s plenty more to choose, where this one came from.

Today, I work with AWS cloud technologies, Serverless and Linux, but really wouldn’t mind working with IBM i once again in the future.

Mr. “i”: it has really been a pleasure…

And for my next post I will talk about another big and great IBM OS: AIX, IBM’s UNIX version, thanks for reading…

MyOwnView in: Amazon Web Services (AWS)

Amazon has really done an amazing job with AWS, since it is well arquitected, well documented, good looking (of sorts), has a VERY large use base, and boy it has loads of:

    • Followers!

Sysadmins like it, developers like it, network guys like it, security boffins like it, technical trainers like it, Everybody likes it! (well maybe the financial directors not as much).

To top it up, it’s constantly innovating, and it’s quite similar to a Chinese buffet restaurant:

    • you cannot finish it all, no matter how hungry for services you are…

Probably, the best technology that AWS can offer is it’s auto scaling technology.

With it you can build adaptive infrastructures that can grow as your system needs to adapt to high demand bursts and scale-down as the hike has gone past.

The good thing is that the technology scales: it scales very big, so the solutions built with it can grow to large installations, giving you more future proof-ness than most other technologies used until now.

Another good thing that AWS offers is it’s well arquitected framework or WAF (note for the networking guys amongst us: not to be confused here with a Web Application Firewall).

It is a reference whitepaper to help design better cloud infrastructures under AWS.
It’s centred around 5 pillars: operations, security, performance, reliability and cost, and it has been written after analysing a myriad of successful client infrastructures and use cases.
It even has its own homepage, tools, labs and approved partners.

It is really an excellent resource for everybody, as it is a proven methodology that pays to follow and comply to.

Here you can check a couple of Hyperlinks:

AWS Well-Architected Framework Whitepaper
AWS Well-Architected Homepage

As things have been moving in IT since it’s inceptions, from Mainframe to mid-range, from central servers to distributed PC’s, from bare-metal to virtualisation, from VMs to containers, now we have just code that can run directly in the cloud (AWS offer is called “Lambda”), where we can execute code directly, without thinking of systems constraints. It sure thing looks like the future right now, but that’s something that only time will tell.

With the use of cloud technologies new leaps forward have been made with the use of Infrastructure as Code (IAC), enforcing some really good practices like change control,
backup, disaster recovery, and even documentation.

It just makes it all easier (once you have learned and adapted to it’s use, of course, as it’s not enforced per default, it’s just that it really seems like the right tool to use).

An easy example of an extract from a CloudFormation template to build an Elastic Load Balancer (ALB) follows:

"ALBListener" : {
      "Type" : "AWS::ElasticLoadBalancingV2::Listener",
      "Properties" : {
        "DefaultActions" : [{
          "Type" : "forward",
          "TargetGroupArn" : { "Ref" : "ALBTargetGroup" }
        }],
        "LoadBalancerArn" : { "Ref" : "ApplicationLoadBalancer" },
        "Port" : "80",
        "Protocol" : "HTTP"
      }
    }


Today, with the right tools, we can build and use really tough environments, scalable, resilient, even auto-healing, and all defined just as code, so it can all be replicated, deleted and created a zillion times, and having different versions of it, for production, for development, test, even to have our own home-labs without having to build DIY-home kits. Things have really moved forward in the last computing decade. This are really good times for the IT lovers!

What are the bad things about cloud computing? -well, probably the cost. -and the momentum of it, I mean, every month new AWS services or options appear, it’s constantly evolving.
That’s not really bad at all, since it brings new options and technologies to use and benefit from; but it sure does seem like you just finished building something, and perhaps a new technology has appeared that might be used, better than what you just used, so probably it does really force you to stay always swimming on the edge of the wave.

But we’ve all always had that little bit of rebel inside us that love when Patrick Swayze and Keanu Reeves catch them amazing waves on Point Brake (or Luke Bracey and Édgar Ramírez in the newest version of the movie, which has even better visuals). So we can’t really complain, can we?

AWS might work out more expensive than other technologies, but it really does depends in the skill of the designer (quite analogous to real life), and in fact, for small start-ups, it works out miles cheaper than traditional IT infrastructure, since you can build some pretty able environments using the free-for-a-year tier that AWS provides, and even without the free-tier, small well-arquitected solutions really cost less that the old combo of computer room space, servers, air conditioning, storage, networking, and a good technician to build-and-configure it all.

You just want to try to run a small start-up on a 6 month breaking point? you can do it easily on AWS for a low amount; try to do that with your own or with rented hardware, and compare the numbers.


From my own point of view: AWS is the most advanced cloud right now, with Azure and GCP coming in close by. It’s also probably the dearest, but the good thing is that we can use cloud agnostic IAC tools like terraform, packer, ansible, saltstack, and the like to build an infrastructure that it doesn’t need to be hardwired to a cloud vendor. Or if it is, at least being IAC, it’s somewhat reusable code to migrate to another one, making the process a lot easier that any other technology that we used previously.

So, for myself: I have definitely added AWS to my favourite technology stack, because is easy to use, it has plenty of documentation and examples, a lot of people use it (and most importantly: developers), it’s well designed and thought out technology that makes your day to day work-life easier.

Another two technologies in my favourite stack? (for the same reason as said before):

  • VMware,

and

  • Veeam Backup & Replication.


Thanks for reading!

On-Premise to AWS Migration

At work, in less than a year, with the help of a consultancy and the devops team from the  central, we managed to migrate from an old hardware based Linux-Web shop to Amazon AWS.

And the change (even after doing a Lift and Shift migration), has been an incredible step forward.

We have passed from os-level storage software mirroring, a set-in-stone hard-coded number of servers and application servers, to an auto-scaling grange of instances.

And now we have forgotten our server names, since we don’t have pets anymore (we have cried when we put them down, just like with any other pets), and we brought an indefinite number of cattle instances to our herd. We don’t put them names any more, we just tag them with a hot iron mark, so we now that they are part of our herd, and we cater for them for a few days or weeks before taking them to the slaughterhouse (more will come after them, so, no need to cry for them anymore).

To learn more about a DevOps classic known as “Pets vs. Cattle“, read on the link.

Now our response times are faster, data, logs and alarms are centralised, disaster recovery and testing is easier to architect and deploy.

All-in-all: a win-win situation.

Here is a nice pic of most of the team members that made this possible.

And do please note, that I have used terms like “Lift & Shift”, “Win-Win”, and the like in this post, which is what is required today to be on the “coolness” front,  otherwise, people might just take you for an old dinosaur. (In the next article I will try to use some other cool-words like Blue-Green deployments and Greenfield-Brownfield, which are also on the list of top-of-the-pops this days) ;o)


News of things to come: –MyOwnView Article series,

I am going to write a new article series called MyOwnView, where I will write my particular view of different operating and cloud systems, where I can explain my impressions in old and new systems, and what I love or hate of each. I have administered quite a few systems, and I have enjoyed every single one of them (it’s just that I have enjoyed some, more than others  ;o)

Catch you soon!

NagiosXI integration with LPAR2RRD

If you have IBM Power hardware, then you probably already know that nobody knows your LPAR resources better than LPAR2RRD or XorMon.

If you use any of the nagios-based monitoring products or Nagios Core, NagiosXI, then if you want to monitor your LPAR resources, you might encounter two situations:

  1. – If you use lpar2rrd, then you already have the lpar2rrd agent installed and gathering performance info from your LPARs. If you do have the agent, and you also want to monitor your servers using nagios, you might also install the NRPE agent or query remotely the LPARs via SSH or SNMP. In this case, then you are querying your boxes for performance data twice, therefore wasting resources, and getting two metrics instead of one.
  2. – If you are not using lpar2rrd and using only nagios resources, then you are not getting all the right metrics about your LPAR resources, or worst: perhaps you are getting inaccurate data.

And what’s the best possible scenario? –Monitoring Integration.

lpar2rrd does an excellent job at monitoring LPARs, so why not let it do it’s best, and integrate lpar2rrd alarms into our nagios? -In this case, lpar2rrd will monitor all the Power-based servers, and report alarms that we have defined into the appliance.

Then, by installing a nagios plugin in the lpar2rrd appliance itself, it will monitor and report alerts to nagios, so no need for a nagios plugin in each of our LPARs: better management, and no extra resource consumption in our LPARs (other than lpar2rrd’s agent, of course) .

This way, individual controls (service checks in nagios), can still be created for a specific server, or we can create controls for resource pools. This is important because, for licensing reasons we might have created a CPU resource pool, and we would like to know when those resources are getting a hit, well all this can be reported in real-time.

All this controls get actually executed in the lpar2rrd machine, and reported to nagios.

Integrating lpar2rrd with nagiosxi, can be achieved by using the plugin provided by lpar2rrd, or you can use the plugin developed by Aitor Ródenas and Myself, and being published in Nagios Exchange (check_lpar2rrd.ksh last version is v2.03).

More info to follow shortly: I will write about the installation and setup in further articles.


HowTo DELETE & RECREATE a Tape Library in Spectrum Protect

Sometimes, we need to delete and recreate all references to a tape library under Spectrum Protect, maybe because we have replaced the HW (even if it is for the same model of library), or because we are running a Disaster Recovery test,
or like on my particular case: because I had a tape library logically partitioned, and I removed the partition and assigned all the tape library resources to my Spectrum Protect server.

The process is not extremely complex, nor trivial, therefore I will post the steps needed to achieve the full change.

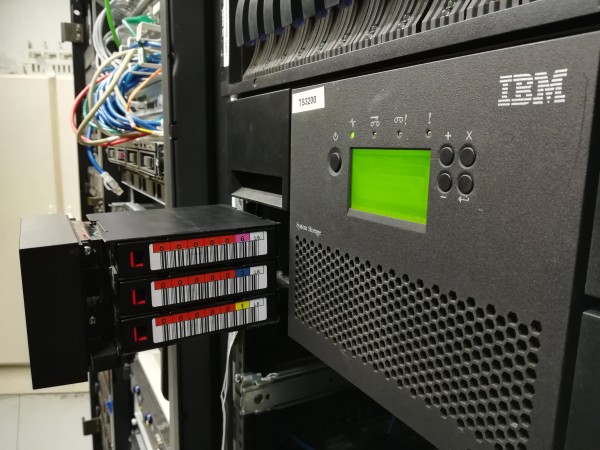
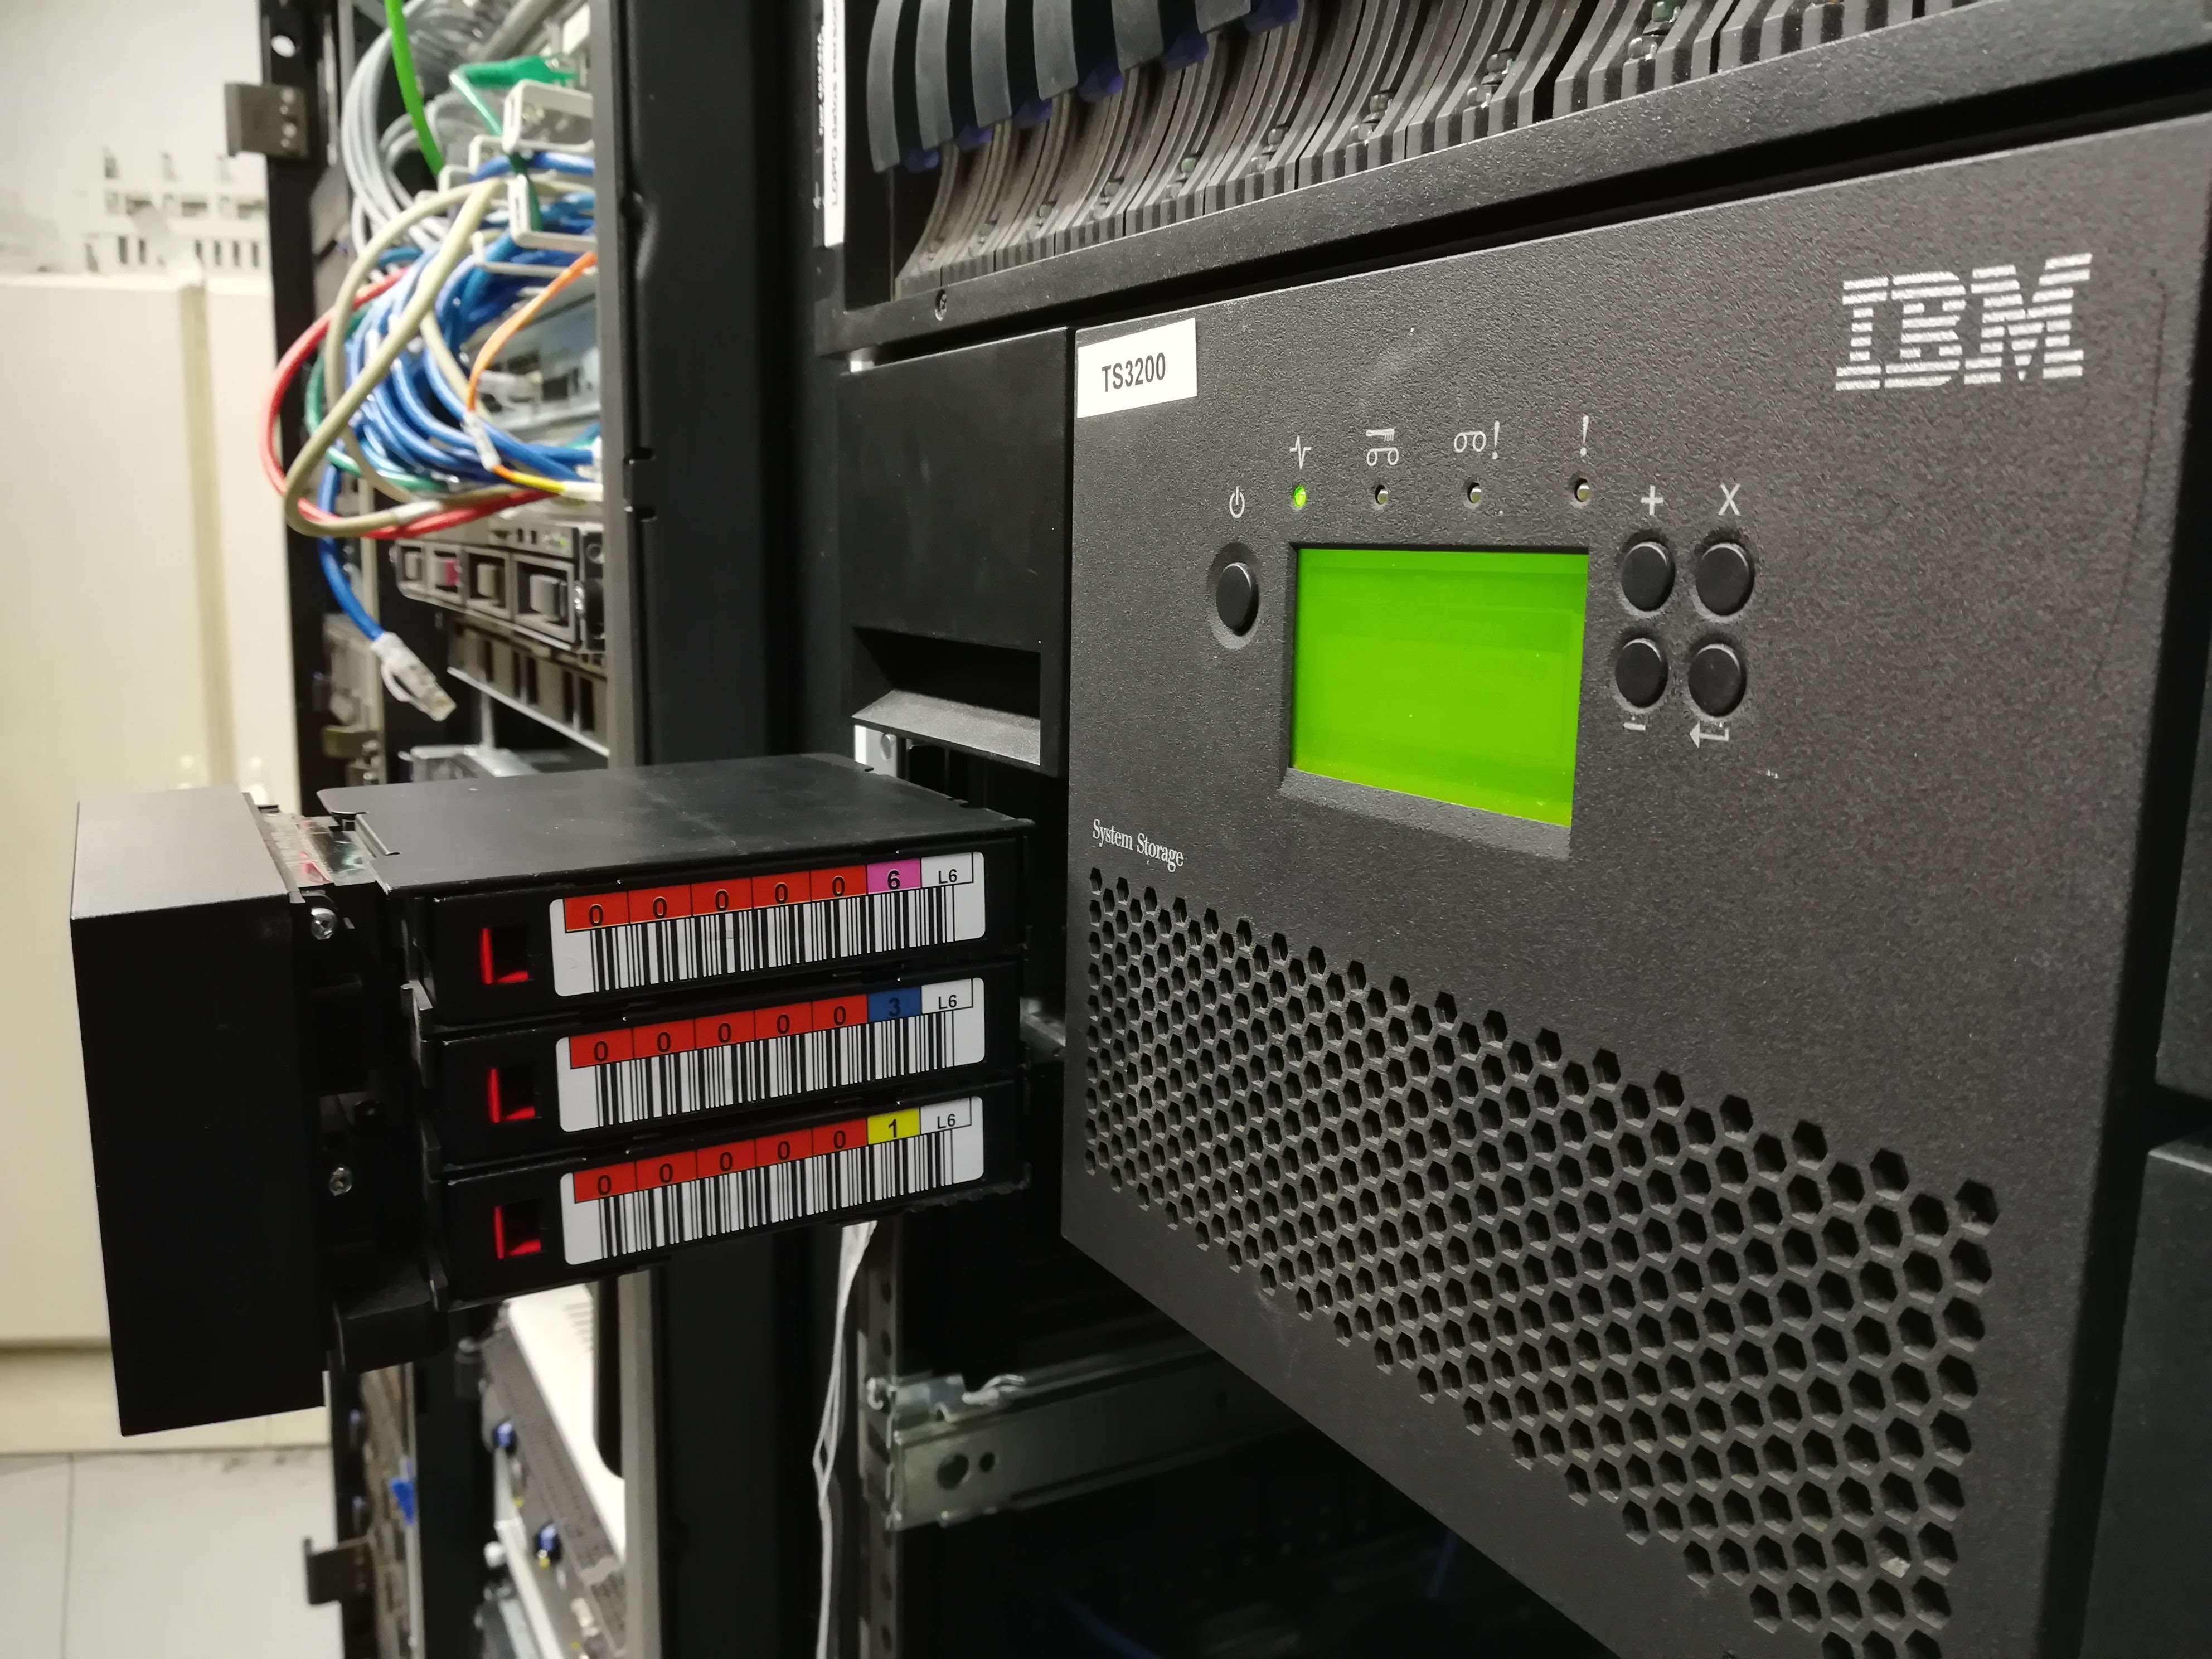
My setup is a Spectrum Protect server v8.1.5 running under an LPAR with AIX v7.2, and my Tape Library is an IBM (Now Lenovo) TS3200 with 4 LTO Tape Drives.
Since I had the TS3200 partitioned in 2 logicalis libraries, the name of the tape library was TS3200_LL2 in my Spectrum Protect server (called spectre), and had 2 LTO tape drives assigned (DRIVE3 & DRIVE4).
After the change, the library under Spectrum Protect will be called TS3200, and will have all 4 drives assigned (DRIVE1 to DRIVE4).

I have put an easy to follow index, step-by-step, first I indicate where is the action performed (SP for Spectrum Protect, AIX for the OS, TS3200 for the physical library GUI interface, and MANUAL: hmm, for -pen & paper!-).

INDEX
1.- SP – DELETE TAPE DEVS
2.- SP – DEFINE LIB SP
3.- AIX – DELETE TAPE DEVICES
4.- AIX – RECREATE TAPE DEVICES
5.- AIX – Get the WWNs from the AIX DEVs
6.- TS3200 – Get the WWNs from the TS3200
7.- MANUAL – CORRELATE WWNs y DEVs
8.- AIX – RENAME TAPEDEVs to follow HW’s ORDER
9.- AIX – CHECK DEVs
10.- SP – DEFINE LIBRARY’s CONTROL PATH
11.- SP – DEFINE LIBRARY’s DRIVES
12.- SP – DEFINE LIBRARY’s PATHS
13.- SP – VERIFY (LOGICAL)
14.- SP – REVISE DEVCLASSES
15.- SP – REVISE SCRIPTS
16.- SP – FINAL VERIFY (PHYSICAL)
16.1.- Try the freshly modified scripts
16.2.- Try to use all the tape drives
16.3.- Check Tape Library HW
16.4.- Check and Backup SP Tape Library Definitions

NOTES
A.- What is a Tape Library Control Path
B.- Final Thoughts

bdr

1.- SP – DELETE TAPE DEVS

First, we delete all references to the old devices, so we find out what we have by issuing <query path>, <query drive> and <query library>, and then, we delete the old devices:

Protect: SERVER1>delete path SERVER1 DRIVE4 srctype=server desttype=drive library=TS3200_LL2
ANR1721I A path from SERVER1 to TS3200_LL2 DRIVE4 has been deleted.
Protect: SERVER1>delete path SERVER1 DRIVE3 srctype=server desttype=drive library=TS3200_LL2
ANR1721I A path from SERVER1 to TS3200_LL2 DRIVE3 has been deleted.
Protect: SERVER1>delete path SERVER1 TS3200_LL2 srctype=server desttype=library
ANR1721I A path from SERVER1 to TS3200_LL2 has been deleted.
Protect: SERVER1>delete drive TS3200_LL2 DRIVE4
ANR8412I Drive DRIVE4 deleted from library TS3200_LL2.
Protect: SERVER1>delete drive TS3200_LL2 DRIVE3
ANR8412I Drive DRIVE3 deleted from library TS3200_LL2.
Protect: SERVER1>delete library TS3200_LL2
ANR8410I Library TS3200_LL2 deleted.

2.- SP – DEFINE LIB SP

Then, we define the new library name, it’s only a high level object, as it doesn’t actually link to the HW until we define the Control Path (if you don’t know what a control path is, you can look at the NOTES section A.- What is a Tape Library Control Path at the bottom of this article).

Protect: SERVER1>define library TS3200 libtype=scsi serial=autodetect RESETDrives=yes shared=yes
ANR8400I Library TS3200 defined.

3.- AIX – DELETE TAPE DEVICES

[root@spectre:/]cfgmgr

[root@spectre:/]lsdev -c tape
rmt0 Available 13-T1-01 IBM 3580 Ultrium Tape Drive (FCP)
rmt1 Available 14-T1-01 IBM 3580 Ultrium Tape Drive (FCP)
rmt3 Available 14-T1-01 IBM 3580 Ultrium Tape Drive (FCP)
rmt4 Available 13-T1-01 IBM 3580 Ultrium Tape Drive (FCP)
smc0 Available 14-T1-01 IBM 3573 Tape Medium Changer (FCP)
smc1 Available 14-T1-01 IBM 3573 Tape Medium Changer (FCP)

[root@spectre:/]rmdev -Rdl rmt0
rmt0 deleted
[root@spectre:/]rmdev -Rdl rmt1
rmt1 deleted
[root@spectre:/]rmdev -Rdl rmt3
rmt3 deleted
[root@spectre:/]rmdev -Rdl rmt4
rmt4 deleted
[root@spectre:/]rmdev -Rdl smc0
smc0 deleted
[root@spectre:/]rmdev -Rdl smc1
smc1 deleted

[root@spectre:/]lsdev -c tape
[root@spectre:/]

4.- AIX – RECREATE TAPE DEVICES

[root@spectre:/]cfgmgr

[root@spectre:/]lsdev -c tape
rmt0 Available 13-T1-01 IBM 3580 Ultrium Tape Drive (FCP)
rmt1 Available 13-T1-01 IBM 3580 Ultrium Tape Drive (FCP)
rmt2 Available 14-T1-01 IBM 3580 Ultrium Tape Drive (FCP)
rmt3 Available 14-T1-01 IBM 3580 Ultrium Tape Drive (FCP)
smc0 Available 14-T1-01 IBM 3573 Tape Medium Changer (FCP)

5.- AIX – Get the WWNs from the AIX DEVs

[root@spectre:/]lsdev -c tape -F "name class location physloc description"
rmt0 tape 13-T1-01 U9009.42A.7803790-V5-C13-T1-W2005000E1115B46F-L0 IBM 3580 Ultrium Tape Drive (FCP)
rmt1 tape 13-T1-01 U9009.42A.7803790-V5-C13-T1-W200B000E1115B46F-L0 IBM 3580 Ultrium Tape Drive (FCP)
rmt2 tape 14-T1-01 U9009.42A.7803790-V5-C14-T1-W2002000E1115B46F-L0 IBM 3580 Ultrium Tape Drive (FCP)
rmt3 tape 14-T1-01 U9009.42A.7803790-V5-C14-T1-W2008000E1115B46F-L0 IBM 3580 Ultrium Tape Drive (FCP)
smc0 tape 14-T1-01 U9009.42A.7803790-V5-C14-T1-W2002000E1115B46F-L1000000000000 IBM 3573 Tape Medium Changer (FCP)

6.- TS3200 – Get the WWNs from the TS3200

DEVICE WWNN             WWPN
DRIVE1 2001000E1115B46F-2002000E1115B46F
DRIVE2 2004000E1115B46F-2005000E1115B46F
DRIVE3 2007000E1115B46F-2008000E1115B46F
DRIVE4 200A000E1115B46F-200B000E1115B46F 

7.- MANUAL – CORRELATE WWNs y DEVs

rmt0 - drive2
rmt1 - drive4
rmt2 - drive1
rmt3 - drive3, OK
smc0 - drive1, OK, it's the one with the Control Path & appears as WWN-L1000... and identified as Tape Medium Changer.

8.- AIX – RENAME TAPEDEVs to follow HW’s ORDER

Call me finicky, but I cannot stand to have a device called rmt2 in AIX and DRIVE4 in the tape library.

This doesn’t usually happen when you just deploy a brand new tape library, since the serials & WWNs should be correlative, however, a couple of years down the line, and a couple of hardware replacements done, and the serials/WWNs are not correlative anymore, and therefore cfgmgr just creates the devices following an order which is not what we need or want. Most people will leave them as is, but I cannot, it produces me severe itch ;o)

Looking at the relationship we did on the previous step:

smc0 = OK (smc0 it’s fine, we only have 1 drive with a control path, so we leave it as-is)
rmt2 = rmt1 / drive1  (we need to rename rmt2 as rmt1)
rmt0 = rmt2 / drive2  (rmt0 as rmt2)
rmt3 = OK (Bonus! one of the devices matches the right drive out of pure probability!)
rmt1 = rmt4 / drive4  (and finally, rmt1 as rmt4)

[root@spectre:/]chdev -l rmt1 -a new_name=rmt4
rmt1 changed
[root@spectre:/]chdev -l rmt2 -a new_name=rmt1
rmt2 changed
[root@spectre:/]chdev -l rmt0 -a new_name=rmt2
rmt0 changed

9.- AIX – CHECK DEVs

We will check that the renaming of the devices matches the hardware descriptions:

[root@spectre:/]lsdev -c tape
rmt1 Available 14-T1-01 IBM 3580 Ultrium Tape Drive (FCP)
rmt2 Available 13-T1-01 IBM 3580 Ultrium Tape Drive (FCP)
rmt3 Available 14-T1-01 IBM 3580 Ultrium Tape Drive (FCP)
rmt4 Available 13-T1-01 IBM 3580 Ultrium Tape Drive (FCP)
smc0 Available 14-T1-01 IBM 3573 Tape Medium Changer (FCP)
 [root@spectre:/]lsdev -c tape -F "name class location physloc description"
rmt1 tape 14-T1-01 U9009.42A.7803790-V5-C14-T1-W2002000E1115B46F-L0 IBM 3580 Ultrium Tape Drive (FCP)
rmt2 tape 13-T1-01 U9009.42A.7803790-V5-C13-T1-W2005000E1115B46F-L0 IBM 3580 Ultrium Tape Drive (FCP)
rmt3 tape 14-T1-01 U9009.42A.7803790-V5-C14-T1-W2008000E1115B46F-L0 IBM 3580 Ultrium Tape Drive (FCP)
rmt4 tape 13-T1-01 U9009.42A.7803790-V5-C13-T1-W200B000E1115B46F-L0 IBM 3580 Ultrium Tape Drive (FCP)
smc0 tape 14-T1-01 U9009.42A.7803790-V5-C14-T1-W2002000E1115B46F-L1000000000000 IBM 3573 Tape Medium Changer (FCP)

10.- SP – DEFINE LIBRARY’s CONTROL PATH

Protect: SERVER1>define path SERVER1 TS3200 srctype=server desttype=library device=/dev/smc0 online=yes autodetect=yes
ANR1720I A path from SERVER1 to TS3200 has been defined.

11.- SP – DEFINE LIBRARY’s DRIVES

Spectrum protect just uses the drives as a logical object for a device, it’s not until you create the PATHs that the physical tape device get associated with a drive.

Protect: SERVER1>define drive TS3200 DRIVE1
ANR8404I Drive DRIVE1 defined in library TS3200.
Protect: SERVER1>define drive TS3200 DRIVE2
ANR8404I Drive DRIVE2 defined in library TS3200.
Protect: SERVER1>define drive TS3200 DRIVE3
ANR8404I Drive DRIVE3 defined in library TS3200.
Protect: SERVER1>define drive TS3200 DRIVE4
ANR8404I Drive DRIVE4 defined in library TS3200.

12.- SP – DEFINE LIBRARY’s PATHS

Here is where we associate the OS tape devices with the SP drive objects

Protect: SERVER1>define path SERVER1 DRIVE1 srctype=server desttype=drive library=TS3200 online=yes device=/dev/rmt1 autodetect=yes
ANR1720I A path from SERVER1 to TS3200 DRIVE1 has been defined.
Protect: SERVER1>define path SERVER1 DRIVE2 srctype=server desttype=drive library=TS3200 online=yes device=/dev/rmt2 autodetect=yes
ANR1720I A path from SERVER1 to TS3200 DRIVE2 has been defined.
Protect: SERVER1>define path SERVER1 DRIVE3 srctype=server desttype=drive library=TS3200 online=yes device=/dev/rmt3 autodetect=yes
ANR1720I A path from SERVER1 to TS3200 DRIVE3 has been defined.
Protect: SERVER1>define path SERVER1 DRIVE4 srctype=server desttype=drive library=TS3200 online=yes device=/dev/rmt4 autodetect=yes
ANR1720I A path from SERVER1 to TS3200 DRIVE4 has been defined.

13.- SP – VERIFY (LOGICAL)

Verify that everything looks OK from the logical perspective

Protect: SERVER1>q path
Source Name Source Type Destination Destination On-Line
----------- ----------- ----------- ----------- ----------
SERVER1 SERVER TS3200 LIBRARY Yes
SERVER1 SERVER DRIVE1 DRIVE Yes
SERVER1 SERVER DRIVE2 DRIVE Yes
SERVER1 SERVER DRIVE3 DRIVE Yes
SERVER1 SERVER DRIVE4 DRIVE Yes Protect: SERVER1>q drive
Library Name Drive Name Device Type On-Line
------------ ------------ ----------- -------------------
TS3200 DRIVE1 LTO Yes
TS3200 DRIVE2 LTO Yes
TS3200 DRIVE3 LTO Yes
TS3200 DRIVE4 LTO Yes Protect: SERVER1>q library
Library Name Library Type Shared TS3200  SCSI       Yes

14.- SP – REVISE DEVCLASSES

Protect: SERVER1>q devclass
Device Cl Device Acc Storage Device Ty Format Est/Max Mount
ass Name ess Strate Pool C pe Capacity Limit
gy ount (MB)
--------- ---------- ------- --------- ------ -------- ------
DBBACK_FI Sequential 0       FILE      DRIVE  51,200.0     32
LEDEV
DISK Random 1
LTO_6 Sequential 3 LTO DRIVE DRIVES
 Protect: SERVER1>q devclass LTO_6 f=d
Device Class Name: LTO_6
Device Access Strategy: Sequential
Storage Pool Count: 3
Device Type: LTO
Format: DRIVE
...
Library: TS3200_LL2
Directory:
Server Name:
... Protect: SERVER1>update devclass LTO_6 library=TS3200
ANR2205I Device class LTO_6 updated.

15.- SP – REVISE SCRIPTS

Protect: SERVER1>q scr
Name            Description                     Managing profile
--------------- ------------------------------------- ----------
AUDIT_LIB       SP - Syncro Tape inventory with Tape library
BACKUP_DB       SP - BACKUP DB & Config
CHECKIN_ALL_LIB SP - CHECKIN ALL Tapes in the Library
CHECKIN_PRIVATE SP - CHECKIN Private Tapes
CHECKIN_SCRATCH SP - CHECKIN Scratch Tapes
CONTAINER_COPY  Run container copy pool operation
CONTAINER_RECL  Run container-copy reclamation
LABEL_TAPES     SP - LABEL New Tapes
PATHS_DOWN      SP - Bring DOWN PATHS & DRIVES of the Tape Library
PATHS_UP        SP - Bring UP PATHS & DRIVES of the Tape Library

As usual, we have a good number of scripts to perform actions with tapes, and as SP forces us to specify the LIB name in each command, we will have to change a few of this scripts to point to the new tape devices.

Also, as we now have 4 drives instead of 2, we will need to modify a couple of scripts to account for the extra tape drives. So, let’s go ahead and change three as an example:

Protect: SERVER1>q scr AUDIT_LIB f=d
...
Name: AUDIT_LIB
Line Number: 5
Command: audit library TS3200_LL2 checklabel=barcode refresh=yes
Last Update by (administrator): CIJALBA
Last Update Date/Time: 06/09/17 10:18:54
Protect: SERVER1>upd scr AUDIT_LIB "audit library TS3200 checklabel=barcode refresh=yes" line=5
ANR1456I UPDATE SCRIPT: Command script AUDIT_LIB updated. Protect: SERVER1>q scr CHECKIN_ALL_LIB f=d
...
Name: CHECKIN_ALL_LIB
Line Number: 10
Command: checkin libvolume TS3200_LL2 status=scratch search=yes checklabel=barcode
Name: CHECKIN_ALL_LIB
Line Number: 20
Command: checkin libvolume TS3200_LL2 status=private search=yes checklabel=barcode
Protect: SERVER1>upd scr CHECKIN_ALL_LIB "checkin libvolume TS3200 status=scratch search=yes checklabel=barcode" line=10
ANR1456I UPDATE SCRIPT: Command script CHECKIN_ALL_LIB updated.
Protect: SERVER1>upd scr CHECKIN_ALL_LIB "checkin libvolume TS3200 status=private search=yes checklabel=barcode" line=20
ANR1456I UPDATE SCRIPT: Command script CHECKIN_ALL_LIB updated. Protect: SERVER1>q scr PATHS_DOWN f=d
...
Name: PATHS_DOWN
Line Number: 1
Command: upd path SERVER1 DRIVE3 srcty=server destt=drive library=TS3200_LL2 online=no
Name: PATHS_DOWN
Line Number: 5
Command: upd path SERVER1 DRIVE4 srcty=server destt=drive library=TS3200_LL2 online=no
Name: PATHS_DOWN
Line Number: 10
Command: upd drive TS3200_LL2 DRIVE3 online=no
Name: PATHS_DOWN
Line Number: 15
Command: upd drive TS3200_LL2 DRIVE4 online=no
Protect: SERVER1>upd scr PATHS_DOWN "upd drive TS3200 DRIVE4 online=no" line=40
ANR1456I UPDATE SCRIPT: Command script PATHS_DOWN updated.
Protect: SERVER1>upd scr PATHS_DOWN "upd drive TS3200 DRIVE3 online=no" line=35
ANR1456I UPDATE SCRIPT: Command script PATHS_DOWN updated.
Protect: SERVER1>upd scr PATHS_DOWN "upd drive TS3200 DRIVE2 online=no" line=30
ANR1456I UPDATE SCRIPT: Command script PATHS_DOWN updated.
Protect: SERVER1>upd scr PATHS_DOWN "upd drive TS3200 DRIVE1 online=no" line=25
ANR1456I UPDATE SCRIPT: Command script PATHS_DOWN updated.
Protect: SERVER1>upd scr PATHS_DOWN "upd path SERVER1 DRIVE4 srcty=server destt=drive library=TS3200 online=no" line=20
ANR1456I UPDATE SCRIPT: Command script PATHS_DOWN updated.
Protect: SERVER1>upd scr PATHS_DOWN "upd path SERVER1 DRIVE3 srcty=server destt=drive library=TS3200 online=no" line=15
ANR1456I UPDATE SCRIPT: Command script PATHS_DOWN updated.
Protect: SERVER1>upd scr PATHS_DOWN "upd path SERVER1 DRIVE2 srcty=server destt=drive library=TS3200 online=no" line=10
ANR1456I UPDATE SCRIPT: Command script PATHS_DOWN updated.
Protect: SERVER1>upd scr PATHS_DOWN "upd path SERVER1 DRIVE1 srcty=server destt=drive library=TS3200 online=no" line=5
ANR1456I UPDATE SCRIPT: Command script PATHS_DOWN updated.
Protect: SERVER1>upd scr PATHS_DOWN "upd path SERVER1 TS3200 srcty=server destt=library online=no" line=1
ANR1456I UPDATE SCRIPT: Command script PATHS_DOWN updated.

At the end, I had to change a few scripts, but if you want to save yourself some time, or have a lot more scripts than I do, then it will be more efficient to redirect all scripts to a text file and manipulate it from the OS (In fact, this is a Best Practice which I recommend to do from time to time: Export your SP Scripts out of SP).

This is easily done with:

Protect: SERVER1>q scr * f=d > /tmp/scripts.txt
Output of command redirected to file '/tmp/scripts.txt'

And then just do a grep from the OS, you can check for the old name and the new name, util, you have modified all the scripts:

[root@spectre:/tmp]grep -c TS3200 scripts.txt
23
[root@spectre:/tmp]grep -c TS3200_LL2 scripts.txt
0

16.- SP – FINAL VERIFY (PHYSICAL)

16.1.- Try the freshly modified scripts:

Protect: SERVER1>run PATHS_DOWN
ANR1722I A path from SERVER1 to TS3200 has been updated.
ANR1722I A path from SERVER1 to TS3200 DRIVE1 has been updated.
ANR1722I A path from SERVER1 to TS3200 DRIVE2 has been updated.
ANR1722I A path from SERVER1 to TS3200 DRIVE3 has been updated.
ANR1722I A path from SERVER1 to TS3200 DRIVE4 has been updated.
ANR8467I Drive DRIVE1 in library TS3200 updated.
ANR8467I Drive DRIVE2 in library TS3200 updated.
ANR8467I Drive DRIVE3 in library TS3200 updated.
ANR8467I Drive DRIVE4 in library TS3200 updated.
ANR1462I RUN: Command script PATHS_DOWN completed successfully.
Protect: SERVER1>q path
Source Name Source Type Destination Destination On-Line
Name Type
----------- ----------- ----------- ----------- ----------
SERVER1 SERVER TS3200 LIBRARY No
SERVER1 SERVER DRIVE1 DRIVE No
SERVER1 SERVER DRIVE2 DRIVE No
SERVER1 SERVER DRIVE3 DRIVE No
SERVER1 SERVER DRIVE4 DRIVE No
Protect: SERVER1>q drive
Library Name Drive Name Device Type On-Line
------------ ------------ ----------- -------------------
TS3200 DRIVE1 LTO No
TS3200 DRIVE2 LTO No
TS3200 DRIVE3 LTO No
TS3200 DRIVE4 LTO No
Protect: SERVER1>run PATHS_UP
ANR1722I A path from SERVER1 to TS3200 has been updated.
ANR1722I A path from SERVER1 to TS3200 DRIVE1 has been updated.
ANR1722I A path from SERVER1 to TS3200 DRIVE2 has been updated.
ANR1722I A path from SERVER1 to TS3200 DRIVE3 has been updated.
ANR1722I A path from SERVER1 to TS3200 DRIVE4 has been updated.
ANR8467I Drive DRIVE1 in library TS3200 updated.
ANR8467I Drive DRIVE2 in library TS3200 updated.
ANR8467I Drive DRIVE3 in library TS3200 updated.
ANR8467I Drive DRIVE4 in library TS3200 updated.
ANR1462I RUN: Command script PATHS_UP completed successfully.
Protect: SERVER1>q path
Source Name Source Type Destination Destination On-Line
Name Type
----------- ----------- ----------- ----------- ----------
SERVER1 SERVER TS3200 LIBRARY Yes
SERVER1 SERVER DRIVE1 DRIVE Yes
SERVER1 SERVER DRIVE2 DRIVE Yes
SERVER1 SERVER DRIVE3 DRIVE Yes
SERVER1 SERVER DRIVE4 DRIVE Yes
Protect: SERVER1>q drive
Library Name Drive Name Device Type On-Line
------------ ------------ ----------- -------------------
TS3200 DRIVE1 LTO Yes
TS3200 DRIVE2 LTO Yes
TS3200 DRIVE3 LTO Yes
TS3200 DRIVE4 LTO Yes
Protect: SERVER1>run AUDIT_LIB
ANR1462I RUN: Command script AUDIT_LIB completed successfully.
Protect: SERVER1>q libv
ANR2034E QUERY LIBVOLUME: No match found using this criteria.
ANS8001I Return code 11.
Protect: SERVER1>run CHECKIN_ALL_LIB
ANR1462I RUN: Command script CHECKIN_ALL_LIB completed successfully.
Protect: SERVER1>q libv
Library Name Volume Name Status Owner Last Use Home El Device
ement Type
------------ ----------- ---------------- ---------- --------- ------- ------
TS3200 000001L6 Private SERVER1 4,118 LTO
TS3200 000004L6 Private SERVER1 4,123 LTO
TS3200 000006L6 Private SERVER1 4,119 LTO
TS3200 000007L6 Private SERVER1 4,125 LTO
TS3200 000009L6 Private SERVER1 4,136 LTO
TS3200 000010L6 Scratch 4,102 LTO
TS3200 000011L6 Private SERVER1 4,139 LTO
...

The scripts work OK.
OK!!!!!!!!!!

16.2.- Try to use all the tape drives:

If we are lucky, SP might launch a Space Reclamation process which will use 2 drives, otherwise by using a MOVE DATA command, we will use 2 tape drives at the same time one for READ and another for WRITE, so by issuing a couple of MOVE DATAs, we will try the 4 tape drives at once.

Protect: SERVER1>q vol stg=tapepool
Volume Name Storage Poo Device Cla Estimated Pct U Volume S
l Name ss Name Capacity til tatus
------------------------ ----------- ---------- --------- ----- --------
000002L6 TAPEPOOL LTO_6 8.9 T 10.7 Filling
000009L6 TAPEPOOL LTO_6 5.7 T 0.4  Filling
000014L6 TAPEPOOL LTO_6 9.5 T 0.0  Full
000019L6 TAPEPOOL LTO_6 5.7 T 0.0  Filling
000024L6 TAPEPOOL LTO_6 5.7 T 8.2  Filling
000031L6 TAPEPOOL LTO_6 5.7 T 37.9 Filling
...
Protect: SERVER1>move data 000014L6
ANR2232W This command will move all of the data stored on volume 000014L6 to other volumes within the same storage pool; the data
will be inaccessible to users until the operation completes.
Do you wish to proceed? (Yes (Y)/No (N)) Y
ANS8003I Process number 5 started.
Protect: SERVER1>q pr
Process Process Description Process Status
Number
-------- -------------------- -----------------------------------------------
5 Move Data Volume 000014L6 (storage pool TAPEPOOL), Target Pool TAPEPOOL, Moved Files: 0, 
Moved Bytes: 0 bytes, Deduplicated Bytes: 0 bytes, Unreadable Files: 0, Unreadable Bytes: 0
 bytes. Current Physical File (bytes): 2,033 bytes Waiting for mount of scratch volume (1 seconds).
Protect: SERVER1>q req
ANR8352I Requests outstanding:
ANR8308I 001: LTO volume 000014L6 is required for use in library TS3200; CHECKIN LIBVOLUME required within 20 minutes.
Protect: SERVER1>reply 1
ANR8499I Command accepted.

Update the status of the tapes in the library to be READWRITE (depends how how many tapes you have, careful since in the following example, I have made READW all my tapes, but might not be wise for your system if you have a big tape library, or different tape libraries –a better example should have been a and update each vol individually, but I am pressed for time ;o) –)

Protect: SERVER1>upd vol * access=readw
ANR2207I Volume 000001L6 updated.
ANR2207I Volume 000002L6 updated.
ANR2207I Volume 000003L6 updated.
...
ANR2207I Volume 000061L6 updated.
ANR2207I Volume 000062L6 updated.
ANR2207I Volume 000063L6 updated.

After a while, all the 4 drives had a tape mounted and where doing operations, so: The drives work fine.
OK!!!!!!!!!!

16.3.- Check Tape Library HW

Bad tapes or problems with barcodes can be checked using the SHOW SLOTS undocumented cmd:

Protect: SERVER1>show slots ts3200
PVR slot information for library TS3200.
Library : TS3200
Product Id : 3573-TL
Support module : 2
Mount count : 1
Drives : 4
Slots : 44
Changers : 1
Import/Exports : 3
.
Device : /dev/smc0
.
Drive 0, element 256
Drive 1, element 257
Drive 2, element 258
Drive 3, element 259
.
Changer 0, element 1
.
ImpExp 0, element number 16
ImpExp 1, element number 17
ImpExp 2, element number 18
Slot 0, status Allocated, element number 4096, barcode present, barcode value , devT=LTO, mediaT=436, elemT=ANY
Slot 1, status Allocated, element number 4097, barcode present, barcode value , devT=LTO, mediaT=436, elemT=ANY
Slot 2, status Allocated, element number 4098, barcode present, barcode value , devT=LTO, mediaT=436, elemT=ANY
...
Slot 42, status Allocated, element number 4138, barcode present, barcode value , devT=LTO, mediaT=436, elemT=ANY
Slot 43, status Allocated, element number 4139, barcode present, barcode value , devT=LTO, mediaT=436, elemT=ANY
.
slot element range 4096 - 4139

No problems in tapes or barcodes found.
OK!!!!!!!!!!

16.4.- Check and Backup SP Tape Library Definitions:

Now that we have redefined the tape library configuration and loaded the tapes, Issue a BACKUP DEVCONFIG and a BACKUP VOLHIST.

Protect: SERVER1> BACKUP VOLHISTORY
ANR2463I BACKUP VOLHISTORY: Server sequential volume history information was written to all configured history files. Protect: SERVER1> BACKUP DEVCONFIG
ANR2394I BACKUP DEVCONFIG: Server device configuration information was written to all device configuration files.

We should go to Spectrum Protects installation directory (by default /home/tsminst1), and look at the devconfig file (devconf.dat).

[root@spectre:/home/tsminst1]cat devconf.dat
/* Device Configuration */
DEFINE DEVCLASS DBBACK_FILEDEV DEVT=FILE FORMAT=DRIVE SHARE=NO MAXCAP=52428800K MOUNTL=32 DIR=/tsminst1/TSMbkup00,/tsminst1/TSMbkup01
DEFINE DEVCLASS LTO_6 DEVT=LTO FORMAT=DRIVE MOUNTL=DRIVES MOUNTWAIT=20 MOUNTRETENTION=5 PREFIX=ADSM LIBRARY=TS3200 WORM=NO DRIVEENCRYPTION=ALLOW LBPROTECT=NO
DEFINE SERVER SPECTRE COMMMETHOD=TCPIP HLADDRESS=10.1.1.207 LLADDRESS=1500
SET SERVERNAME SERVER1
DEFINE LIBRARY TS3200 LIBTYPE=SCSI WWN="2001000E1115B46F" SERIAL="A0L4U78W5927_LL0" SHARED=YES AUTOLABEL=NO RESETDRIVE=YES
DEFINE DRIVE TS3200 DRIVE1 ELEMENT=256 ONLINE=Yes WWN="2001000E1115B46F" SERIAL="A0WT025496"
DEFINE DRIVE TS3200 DRIVE2 ELEMENT=257 ONLINE=Yes WWN="2004000E1115B46F" SERIAL="A0WT038765"
DEFINE DRIVE TS3200 DRIVE3 ELEMENT=258 ONLINE=Yes WWN="2007000E1115B46F" SERIAL="A0WT046112"
DEFINE DRIVE TS3200 DRIVE4 ELEMENT=259 ONLINE=Yes WWN="200A000E1115B46F" SERIAL="A0WT045812"
/* LIBRARYINVENTORY SCSI TS3200 000001L6 4118 101*/
/* LIBRARYINVENTORY SCSI TS3200 000004L6 4123 101*/
...
/* LIBRARYINVENTORY SCSI TS3200 000062L6 4121 101*/
/* LIBRARYINVENTORY SCSI TS3200 000063L6 4105 101*/
DEFINE PATH SERVER1 TS3200 SRCTYPE=SERVER DESTTYPE=LIBRARY DEVICE=/dev/smc0 ONLINE=YES
DEFINE PATH SERVER1 DRIVE1 SRCTYPE=SERVER DESTTYPE=DRIVE LIBRARY=TS3200 DEVICE=/dev/rmt1 ONLINE=YES
DEFINE PATH SERVER1 DRIVE2 SRCTYPE=SERVER DESTTYPE=DRIVE LIBRARY=TS3200 DEVICE=/dev/rmt2 ONLINE=YES
DEFINE PATH SERVER1 DRIVE3 SRCTYPE=SERVER DESTTYPE=DRIVE LIBRARY=TS3200 DEVICE=/dev/rmt3 ONLINE=YES
DEFINE PATH SERVER1 DRIVE4 SRCTYPE=SERVER DESTTYPE=DRIVE LIBRARY=TS3200 DEVICE=/dev/rmt4 ONLINE=YES
SERVERBACKUPNODEID 1

OK!!!!!!!!!!

NOTES

A.- What is a Tape Library Control Path

A Tape Library Control Path it’s a logical path for a SCSI Medium Changer to send commands over to tape drives.

Each tape library has at least one control path, and for example on an AIX OS, the tape drive with the control path, will create 2 devices, one for Tape Drive and one for the Tape Medium Changer (in this example rmt1 and smc0 are really the same physical device):

[root@spectre:/tmp]lsdev -c tape
rmt1 Available 14-T1-01 IBM 3580 Ultrium Tape Drive (FCP)
rmt2 Available 13-T1-01 IBM 3580 Ultrium Tape Drive (FCP)
rmt3 Available 14-T1-01 IBM 3580 Ultrium Tape Drive (FCP)
rmt4 Available 13-T1-01 IBM 3580 Ultrium Tape Drive (FCP)
smc0 Available 14-T1-01 IBM 3573 Tape Medium Changer (FCP)

There is a catch here, and that is: if the tape drive with the control path is taken down, all the tape librarie’s drives will stop working, as the communications bus with the library is down.

In that case, and while we replace/repair the hardware, we will have to change the control path over to another drive, and perhaps reconfigure the device in AIX and Spectrum Protect.

We can have more than one control path in a library to eliminate single points of failure (as this is a clear SPOF in a several drives tape library), however it comes at a price, as at least in IBM libraries, an extra licence must be purchased, to enable Control Path Failover (CPF). In some cases, having CPF also enables Data Path Failover (DFP), which includes load balancing of the HBAs.

B.- Final Thoughts

Well, Phewww, now that was a bit of a long ride, wasn’t it? It’s not actually complex, it’s just a matter or order, and if done in the right sequence (and after having devoured a few red books, and technical guides) it’s pretty straight-forward.

Just try not perform this procedure very often, as it does take a few hours work, and while the process is being done Spectrum Protect cannot use the library (you can do it quicker if you script the lot, of course, and for Disaster Recovery it is recommended, because one or two hours saved in time might make a huge difference).

I hope you have enjoyed the procedure, and any comments or steps which can be done better are always welcome, so if you have suggestions, post them here to <<Give the sysadmin a shout!>>

Blog at WordPress.com.

Up ↑